Saturday, March 16, 2019

DEER BE GONE


What gardener out there hasn't suffered the plague of dastardly deer?  You watch the bud formation of those prize special double daylilies and just as they're ready to open, you go out the next morning and find the tips nipped off!  It's not like they eat the whole bud....just a nibble here and a nibble there.
I'm convinced they do this out of pure devilment.

And continuous fencing around your yard can be useless in some ways unless you're prepared to install one that's 8 feet high.  Anything less they can jump and a solid fence just gives them a stable. unmovable structure that they can eyeball and 'boom'.  
They sail right over.

One option is to add a living fence of shrubs on the inside of your fence.  Deer are hesitant to jump over and into and area where they don't know what's on the other side.

I've also discovered that deer are 'line of sight'.  It doesn't help to plant those daylilies farther away.  If they can see them - they want them.
Like a kid in Walmart makes a beeline for the toy aisle.

One thing deer don't like is anything that brushes against their legs or nose that they can't see.
A friend of mine owns a landscape company and some of her customers use fishing line strung around flower beds and says it spooks the deer when those knobby little deer knees brush against it.  I tried that but got tired of constantly replacing the line since it breaks down quickly in the hot summer sun.

That's when I got serious about keeping these voracious eating machines out of our yard.
I went to Home Depot and loaded up on rolls of Bird/Deer Netting.  That combined with garden trellises had been pretty effective at protecting my flowers so they ended up in my grandmother's crystal vase and not in their tummys.

Since the trellis/netting seemed to work pretty well, I decided to take my war on invading deer to the next level.  One day when cruising the local Lowes I came across the Grand Empire No Dig fence.  They have the elegant look of more expensive estate fences.

Decorative Estate Trellis and Fence Panel with Deer Netting
You can barely see the deer netting in the above photo, but it's there.  It's made by Sta-Green, comes in a roll of 100 ft long x 7 ft wide PVC netting and costs about $20 which is a real bargain.
Just be careful you don't accidentally grab the other brand by mistake.  It's priced a hefty 50 bucks!
(I think I'll go out and stock up while the prices are still low on the Sta-Green.)

These do-it-yourself fence panels are very easy to put up and cost less than permanent expensive fencing panels.
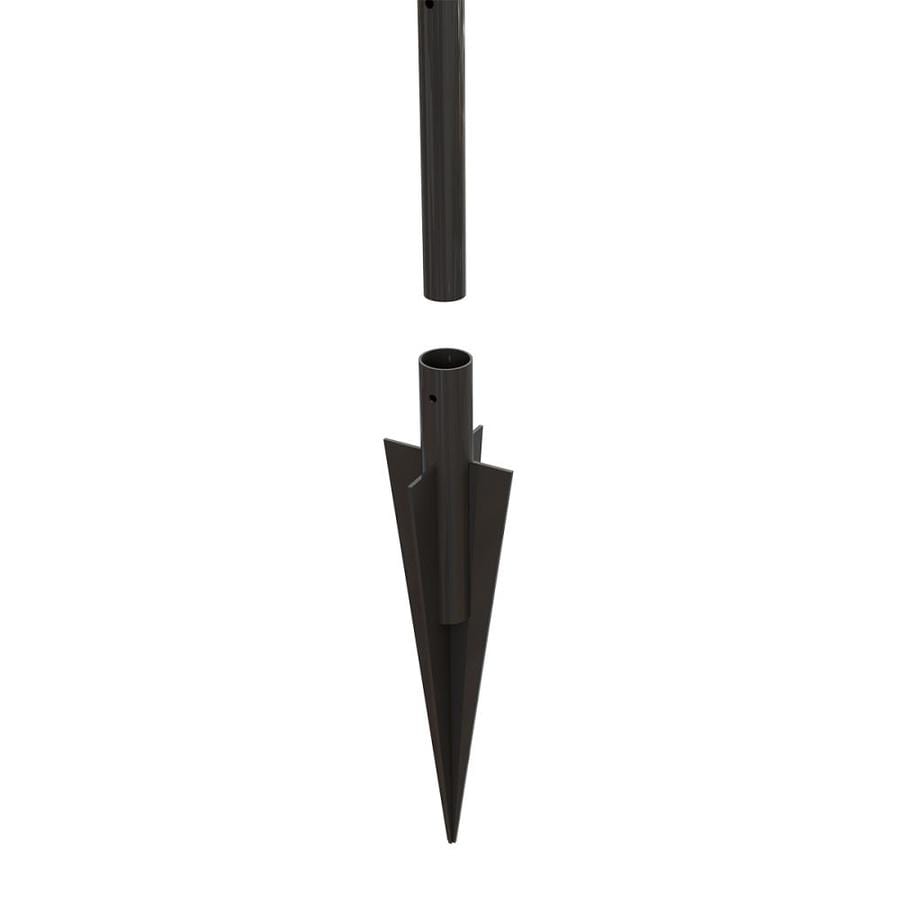
Separately sold are round metal posts that have sturdy detachable pointed bottoms that you hammer into the ground.  Then you line up the loops on each end of the panels, slide the post down through and into the base in the ground.
Step in the tall trellis section on each side and you're good to go.

No Dig Posts

 https://mobileimages.lowes.com/product/converted/651082/651082504063_09886281.jpg

The trellises I used for side accents can be found here:
Tall Estate Trellis - 60 Inches  and are priced very reasonable as far as metal trellis go.

The great thing about this fencing is that it isn't permanent with the posts set in concrete like other fencing.  You can't mess up the installation and it's moveable if you change your mind


Of course, this alone will not deter hungry deer so I run a length of 'deer fence' netting across the front of the yard and these panels help hold it high enough to create a decent barrier.
This used to be sold as bird netting at the big box hardware stores until the manufacturers realized people were using it as deer fencing and renamed it.  It's black in color and nearly invisible until you get up close.
It's a very tough netting that's long lasting unless you get a really aggressive buck that can rip a hole in it when on a rampage. 
It's also made in a way that will catch on anything including your garden boots and even your fingertips.

I have plum and apple trees that the deer will stop at nothing to get at them.  So, what I've done is take old wire clothes hangers and cut sections to make S-hooks and hang the netting from the outer branches so they can't get at the fruit.

Before I had finished my net fencing, as I was coming home one evening I surprised a deer standing in the driveway, licking his lips as he contemplated stripping our plum tree.
In a panic to escape, he ran across the yard and through a section of netting that was done, but invisible to those sweet bambi eyes.
That deer probably wore that netting into the next county.


When I went out the next morning I could see where where he'd pawed the ground around the tree in frustration.

Oh, deer....no fruit compote for you this morning!


More photos coming soon ~

As I continue adding to these fence panels, I will be adding more pics.  I think the sloping side panels in the Empire No Dig line will look great with the Decorative leaf panels also sold at Lowes.

See you soon!


Thursday, September 15, 2016

Snowy White Egrets

Our cottage sits by a lagoon that was installed long ago as part of a chain of lagoons meant for flood control and they normally handle the job very well.  They now attract a lot of wildlife and have become a haven for white egrets, wood ducks, kingfishers and a boat load of turtles that come up into our yard and lay their eggs.  We've yet to see an alligator, though we're told their around. A friend of mine has a lawn care outfit and was working in yard on the island when one of her workers yelled at her.  She turned around and a huge alligator was sneaking up behind her.  Larry came running over waving a rake (much good that would do) but she took off running.
I think I'll pass on that particular wildlife encounter!

Every spring a group of white egrets fly in and perform what we call 'The Cotillion'.  They form a circle and one duo at a time, a male and female fly up and circle each other before flying off to start their family.  This goes on until the last pair fly away.


Tuesday, November 3, 2015

Removing Stubborn Black Mildew Stains From Fabric

My friend just bought a quilt from a thrift shop. It's not a vintage quilt, but it had those dreaded black mildew spots that can be very hard to remove. She's laundered it but the spots are still there. So I did some digging around for more info on spot removal and came across this advice from 'How To Clean Stuff'.
Now I've written previously about using Oxyclean, Clorox II or the cheaper alternatives you can buy at the dollar stores.  I've used them with great success for most stains.
The Dollar General brand is:
DG home
All Fabric Powder Bleach
-Phosphate free/Non-chlorine
-Color safe
-Safe for septic systems

 If that doesn't work; the article suggests:
Test a small area first to ensure that the color is not affected, as lemon juice can have a bleaching effect on some fabrics.
    Spread the paste over the stained areas.
    Allow it to set for 15 to 30 minutes.
    After the paste has set on the stain, scrape it away and flush the area with water.
    Launder again as usual.
    For cotton and linen fabrics, oxygen bleach can be used (oxygen bleach is different from chlorine bleach, which is not recommended).
    Mix powdered oxygen bleach (do NOT use chlorine bleach), water and a few drops of ammonia.
    Test a small area first.
    If the test area goes well, and there are no adverse effects, spread the paste over the entire stained area.
    Allow it to set for 15 to 30 minutes.
    Remove the paste and flush the area with clean water.
    Launder the piece as usual.
    Check the fabric thoroughly before drying to ensure the stain is completely removed. It works well to allow the piece to air dry the first time to check


Do not soak darker color fabrics such as red, black or navy with pastels or whites!  Even today's modern fabrics dyes can be unstable and bleed.  We all learn from trial and error, but that should be at the top of the list of  'thou shalt nots'.  Hubbys usually commit this crime early in the marriage.  Sorry, fellas....we love you to pieces, but the next time you throw that red football jersey in the washer with my white chiffon blouse;  you will suffer unspeakable pain.
Men, just write this caveat down when you take up residence with your other half:
Don't pi$$ off the cook!

Sunday, March 8, 2015

Sweet Country Cottage Style Cathedral Quilt Pillow from Vintage Linens & Lace


This is my sweet cathedral quilt cottage style pillow with Laura Ashley 'Rosemoor' print.  I used the roses & buds for the 'windows' and trimmed it with a wonderful vintage lace I found on a trip through Amish country.

I actually started working on the pillow while on a road trip up the east coast with my hubby and thrifting/salvage partner in crime.

That in part is why of all my shabby cottage pillows; this one took me the lo-o-ongest time to complete.  Once I start working on a project I tend to lose myself in the design, but it was a great way to pass time on the road and it beats counting blue cars!

The central part was a cathedral quilt square I started and I didn't know where in the world I was going with this pillow.  Most projects I just sit down and start stitching and playing with fabric until it talks to me.  Just setting the central section in a standard square didn't feel quite right, so I placed in on the diagonal. 
I selected Laura Ashley fabric 'Rosemoor' to use as the 'windows'.  I cut out individual squares of the roses and rosebuds as focal points and I'm pretty pleased with the results.


The beautiful vintage ivory lace is from a bulk lot I found at Barnesville Antique Mall in Barnesville OH which is a wonderful two-story old brick building and a wonderful place to browse.  The upstairs had several dealers who specialized in vintage textiles and this is an excellent area to find vintage handmade items from the nearby Amish communities.  The batch I found had all sorts of neat items that were saved from old clothing such as lace trimmed jabots, cuffs and bodice neckline inserts as well as crocheted trim.  When it comes to recycling-the Amish can really show us how!


Blessings...

              Pamela


Saturday, February 28, 2015

Vintage Chair Is A Time Capsule


This is one of my more recent thrift store finds.   I've started to track down the era for this chair and as you can see; it's quite ornate.  The top of the shield back is intricately scrolled and the arm rests resemble lion's paws.  The legs are wonderfully turned.


 There's work to be done to restore it, but it's mostly minor.  Loose joints to be clamped and re-glued and a few small pieces of the veneer on the shield back are missing, but I've got an old sheet of walnut veneer that I can use to patch those areas.


 I decided to gently take the old furniture tacks out and strip the fabric layers back one by one.  And yes...I saved the old tacks.  I told you I never throw anything away!
This was like going through an archaeological dig with multiple layers of fabric from the past.


Now, to me this is the real challenge.  After I got down to the real nitty gritty; I was thrilled to see that the original beautiful wool needlework seat cover had been left intact. Sadly, part of the floral design was gone due to years of wear.  I give thanks to the former owner who decided to cover it over instead of ripping it off and throwing it away.


 I took the previous picture and ran it through photo editing software to pull out the 'ghost' of the missing yarn.  This gives me a better idea of what the missing flowers would have looked like.


Now off I go to try and track down a similar design in all of the antique/vintage cross stitch or other needlework patterns out there to bring this baby back to it's former glory.
Wish me luck!


Pamela


Well....I'm back.  That took some digging around in the interwebs.  I finally came across this needlepoint design that I might be able to adapt to this chair seat.


It's close enough to give me an idea of what the original flowers might have been.  Especially the blue ones.
After I completely removed the seat cover and was able to see the reverse side, it gave a better look of the original colors of the yarn.


Look how clear and bright those colors are!  Now I can rummage through that stash of yarn I've been hoarding for thirty years and see if I can come up with a match.
A nice winter project when the cold weather chases me out of my garden!


Thursday, February 26, 2015

DIY Birdbath - A Plowing Disk Gets A New Life


A neighbor planned on tearing down an old barn that had been on his mother's property since the early 1900s.  It was filled with old farm implements and cast-off furniture that no-one in the family wanted so he let me go through and haul out what I could before he took the dozer to it.
I found a new use for one of the plowing disks.  My husband had an old hand pump stored away in the garage that he rescued from his grandfather's farm in Pennsylvania and we paired them up on a garden seat for the birds to enjoy.


The trellis had already been there for my autumn clematis so I hadn't given it much thought until later when a friend said it reminded her of a church window.
An accident of design, I suppose.
The crape myrtles were in full glory and made a nice backdrop.
It was sad to see a barn that had stood for a century reaching the end of it's life in order for someone to build a new house, but I console myself at reminders like this and realize this is why I rescue what in someone else's eyes is useless clutter.  
We're just keepers of the flame.

Saturday, February 21, 2015

Works In Progess - My Little Angel. Naughty or Nice?

I love angels and had kicked around an idea how to incorporate one into one of my cottage pillows. So I sat down at the drawing board and started sketching. Did I want my angel in flight, with full flowing robes? That would be a bit busy to fit onto the central section of the pillow. Then I wondered if my angel was going to be a girl or boy.
I finally settled on a head and shoulders sketch with wings outstretched. And the short feathered curls could belong to a boy or girl, so my little angel turned out to be more unisex.


Then after transferring my sketch onto vintage white percale via a lightbox, I went to work embroidering my design.
After I was done, I sat back and studied the final project and had to admit...my angel looked just a tad naughty.
But I guess there's a bit of devil in us all.
Even angels!


Now I'm off to rummage through some vintage fabrics and lace to find the perfect border for my sweet little angel!


Tuesday, February 17, 2015

Care To Join Me For Tea?

I went to a local Habitat Restore shop on John's Island and found this darling vintage wicker breakfast in bed stand with glass tray.  The stand has two side compartments for magazines and newspapers.
This makes me think of those 1940s glorious goddesses of the silver screen relaxing back among tousled satin sheets and enjoying early morning tea or coffee while they browsed the latest scandal sheets.


And of course there was sultry film queen of the 1930s, Jean Harlow who had breakfast in bed down to a science.


I can't wait for warmer weather so I can play dress-up in a vintage peignoir and coax my hubby to serve me breakfast in bed.
Okay, well.....maybe not breakfast.

Hey!  Can I get a cup of coffee over here?


Clamshell Cottage Vintage

Friday, February 13, 2015

Confused Camellia

Every once in a while mother nature throws us a curve.  We planted this pale pink camellia japonica three years ago and some of the blooms are starting to come out a deep rose pink.
What a delightful surprise!
We'll be covering this poor sweetie tonight as the temps dip down into the upper 20s here on the island.


Tuesday, February 10, 2015

Antique Valentines Cards


Valentine celebrations have evolved from the martyrdom of St. Valentine, a third-century priest, into a romantic exchanging of gifts, notes and cards.
Early valentines were produced in a variety of forms-mechanical, flat, and three-dimensional.


The card below was valued at $350.

From a February 2005 issue of Country Living
This antique valentine dates from the early 1900s and is a three-dimensional chromolithographed card printed on heavy card stock imported from Germany.  The fold-out mechanism allows it to stand alone.
The most sought after cards are ones made by Esther Howland, the McLouglin Brothers, and Raphael Tuck & Sons; all of whom were active during the mid-19th century and collector values range from a few dollars to prices in the thousands.


Clamshell Cottage Vintage